|
              
THE TECHNICAL PAGES
The laser-inclinometer (by Paul De Bie)
INTRODUCTION
I read an article once in Spelunca (June 95) about a laser-distancemeter,
that also had a build-in compass and inclinometer. Strangely enough, the
inclinometer was a standard analog Suunto! These days, electronic
alternatives are available to measure slopes with a much higher precision
than the analog Suuntos. In our club, we constructed in 1994 our first home-made
electronic inclinometer with a small incorporated laser. Possibly,
this was the very first time ever that such a device was build, and we are
proud to have participated at what will probably be "the future" of cave-surveying
equipment. As a result of our experiences, at least 5 other Belgian surveyors
made such a device as well, and everyone is extremely satisfied about it.
Here's a brief description of this device and how to build one.
MATERIALS
a) the electronic inclinometer: we used an electronic "level"
from Bosch, type DNM6. Precision is 0.3 degrees. Digital (LCD) display.
It costs around 3730 BEF (100 USD) + VAT.
b) the laser: an "Infiniter" laser-pointer. Costs around 2000
BEF +VAT (54 USD), but these days you can find them much cheaper. It looks
like a ball-point, is made from inox, and is normally used to point out
things during slideshows. It produces a powerful laser beam, with a reach
of over 100 metres. Class IIIA laser, <5mW output. Uses 2 AAA batteries. These days, you can find them in different sizes,
materials and brands but keep these things in mind:
Uses 2 AAA batteries. These days, you can find them in different sizes,
materials and brands but keep these things in mind:
- must be powerful enough (some lasers hardly reach 25 m!)
- some small models use expensive Mercury-batteries (button-cells)
- on/off switch must be easy to manipulate or must be replaceable
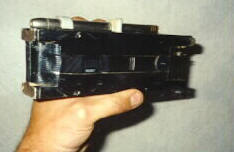
MOUNTING
The level is an aluminium profile of 60 centimetres long! You must shorten
it. The measuring-unit is located in the middle of the level, so cut of
(with a saw) both extremities of the level, just leaving the central part
(about 17 cm. long). It should be possible to really extract the measuring-unit
itself, but we did not do this: it is far more easy mounting the laser afterwards,
if you leave the surrounding aluminium profile intact! By the way: if you
want to make a nice-looking instrument, then cut the edges not at a right
angle, but oblique. This way you can re-use the rubber plugs that close
off the profile at both sides!
The profile has got a groove on top of it. It is just perfect to lay
the Infiniter laser pointer in it, which can be fixed with two small braces
(e.g. the ones used to fix electric cable against a wall). I also suggest
that you fix a small waterproof switch on it, so you can switch
the laser off/on during your measurements. Normally you switch it on by
pressing a clip, but then you have to keep it pressed in all of the time.
Not very practical!.
In order to protect the LCD-display and the push-buttons, I suggest you
put a clear and soft plastic over them, that you fix at the edges by means
of tape.
IMPORTANT: prior to mounting the laser pointer, you should check
if the laser beam doesn't have a lateral deviation. Put the laser pointer
on a flat surface (e.g. table) and point the laser beam at a wall which
is +/- 5 m away. Now slowly roll the pointer around it's axe (without
moving it sidewards!). The red laser spot at the wall should not move. If
it does move (or describes a small circle), then the laser beam is not correctly
aligned with the body of the pen. You should fix the pointer on the electronic
level so that the deviation is in a horizontal plane and not a vertical
one. This way, the deviation will not influence your readings.
USING THE LEVEL
Keep the level at the "from" survey station, with the tip of the pointer
besides the station. Beam at the "to" station. Wait a second or so, try
keeping the red spot at the to-station and press the "hold" button on the
level. The measured slope will be kept on the display until you press this
button a second time. But first, of course, write down the slope in your
survey-book. It is a good habit to repeat the measurement again. It should
not differ more than 0.5 degrees, if it doesn't: check a third time.
The survey station can be every striking point in the cave: stalagmites,
rocks, protuberances etc. But, since finding the appropriate point is often
time-consuming and difficult, we use our own surveys stations (and you can
even use them with a normal Suunto clinometer as well!). They are very easy
to make: take 40 cm of stiff electricity-wire (diameter 2,5 ?4 mm?) and
fix a small plastic disc (3-4 cm in diameter) with some tape on one of the
ends. To improve the visibility, put some "scotchlite" reflecting tape on
the plastic disc. This "lolly" (see picture!)
can now be used as a removable survey station: you can easily put it in
a mud floor, ply it around a rock etc.! You will save a lot of precious
time this way, and you'll always have a survey station there were you want
it (often, natural stations or too close to the wall, ceiling or floor to
permit an easy and accurate measurement!). Thanks to the scotchlite, you'll
even see it at great distances. When using it with the laser pointer, you'll
immediately see it when you "hit" the scotchlite!
Of course, you should use and mark a "fixed" survey station from time
to time, let's say every 5-8 stations, in case that you have to continue
or repeat the surveying in this area of the cave!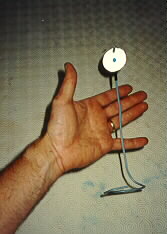
ADVANTAGES
To fully understand the advantages of this electronic level, you can
best compare with a normal analog clinometer:
- readability: always perfect! Since the reading is stored on
the display after pressing the "hold" button, you just keep the level in
front of you and illuminate it with your headlight. A normal Suunto is often
difficult to read, especially in the dark (and in a cave, it's always dark!).
We solved this by mounting a small LED, powered by a small battery, on the
glass of the Suunto clino. But the problems remains when the lens of the
clino is muddy or damp.
- location of the survey station: of no importance anymore! With
a Suunto, your "from"- station can not be too close to the wall or floor.
Especially a steep slope UPwards, with a survey station that is too close
to the floor, is almost impossible to measure. The poor surveyor has to
lie flat on the floor and nearly breaks his neck trying to look up! With
the electronic level, this problem does not exist anymore: EVERY point can
be used.
- precision: a lot better! The precision is 0.3 degrees. Normal
Suunto's are 1 degree. But, more important: the risk of making a mistake
when reading the inclination is very small, since the slope is shown digitally.
The "classic" error, that one often makes with a Suunto, is reading "6"
or "26" instead of "16".
We also have noticed that ALL Suuntos have a problem measuring nearly
horizontal slopes. These errors can be in the order of 1.5 to 2 degrees!
So, your clino will read +1.5 while it is in reality +0.5 degree. Furthermore,
this error is less important or inexistent when measuring steeper slopes.
So you can hardly use an error-correction factor in your survey calculations.
Try this with your Suunto: put two wooden poles (A & B) in your garden,
10 meters away, and both +/- of the same length. Now measure the slope from
A top B. Suppose it reads -1.5?. Now repeat the measurement from B to A:
it should read +1.5, but... there is a fair chance that it reads -0.5 or
0!
- it is robust: ours has survived 10 m drops, without even being
de-calibrated.
DISADVANTAGES OR THINGS TO KNOW:
- it is bigger and heavier than the Suunto
- as the Suunto, it is not 100 % waterproof (but we have dropped ours
a few times in a pool of water and never had any problem with it afterwards.
Just open the battery compartment and dry it with a cloth).
- uses batteries (9 V for the level, 2 x AAA 1.5 V batteries for the
laser), so there is a potential risk of having a too low battery to continue
measuring. The autonomy of the electronic level is very long: you will make
at least 50 to 100 survey-trips with it. The autonomy of the laser pointer
is however a lot shorter. My experience is that you should replace the batteries
every 7 ?10 survey trips. So: always carry a set of spare batteries with
you, just in case.
- when measuring slopes that are nearly horizontal (<10 degrees), it
is not always easy to see if it is a positive or negative inclination. The
LCD screen will display the inclination in digits only, but no + or - sign.
It will however indicate by means of small triangles what side of the level
was the highest (and lowest). Once you're used to it, it isn't a problem
anymore. Of course, when measuring steeper slopes, you can tell instinctively
whether it is upwards or downwards!
A nice gadget: you can keep the level upside down: the digits on the display
will automatically reverse! This is practical when the from station is situated
at the cave floor itself.
- you MUST keep the level +/- straight (this means, in a vertical plane,
with the LCD display pointing sidewards). If you would put it, in the most
extreme case, flat on it's side, it doesn't work anymore. Of course, this
is also true for a normal, analog Suunto!! We have tested this and in fact
you must really exaggerate (tilt it at least 35 degrees) before the reading
gets unreliable.
- Do not point the laser beam in each other's eyes. It should not be
harmful, but one never knows.
EXPERIENCES
YOU WILL SURVEY A LOT QUICKER! No more hesitation: is it 33 ... or 37
... or 23?? And after 10 seconds of hesitation (with a Suunto), the lens
has gotten damp, and you have to begin again. With the Bosch, you have the
reading immediately.
YOUR SURVEY WILL BE MORE PRECISE! We have made several "closed loops"
in caves with a nearly perfect closure error in the Z-plane. E.g. a 100
m long closed circuit in Trou Weron, a difficult and narrow cave, with a
closure error of X=13 cm, Y=11 cm, Z=0 cm!.
YOU WILL SURVEY LESS FRUSTRATED! Often, with Suuntos, when the stations
are badly chosen, or in narrow squeezes, it takes you minutes to make a
good reading. You have to lie flat in the water or in the mud etcetera.
With the Bosch, these problems belong to the past.
It takes some practise to quickly point the laser spot at the TO-station.
But the water-saturated atmosphere in a cave greatly helps: you can see
the red laser beam.
You can use the laser pointer to make surface surveys as well, but not
in strong (sun)light, and at the condition to make short shots. The laser
easily reaches 100 metres or more, but you will not be able to locate the
tiny red spot ... Of course, you can survey overnight!
CONCLUSION
At a price that is not much higher than the price
of an analog clinometer, you can build a device that is a lot more handy
and precise. In the hands of a good handyman, who will build it in a waterproof
case, it will be even better than what we made. Should a manufacturer of
caving gear commercialize this, it would be a lot more compact, cheaper
and probably waterproof. THIS IS AN APPEAL TO YOU ALL, MANUFACTURERS!
You could even build in a compass, or combine it
with a laser "DISTO" !
Late breaking news (April 1998);

The model of level that we used has been
replaced by another one. The new model is the DNM 60 L, which offers some
extra functionalities, such as an "auto-off" to save on the battery
that will switch off the level if it isn't used for a while.
|